
Centralized Editing
Here at Pixel Bokeh, we’ve been using FCPX for the majority of our editing work for the last few years and it’s worked great for ensuring professional results. Features such as keywords, favorite selections, Event Browser, and even the magnetic timeline make working with FCPX an amazing experience. Using FCPX in a traditional editing setup i.e.. NLE, editing computer and attached local editing drive is fine, but if working with FCPX has taught us anything, it is to want and expect more from how we edit and manage media.
We decided we wanted a way to have all of our projects in one place instead of having each editing station with a localized editing drive. This would allow us to be far more flexible as to who was able to work on what projects, and also help ensure that all of the projects were getting regularly backed up in one location.
The SAN Option of Centralized FCPX Editing
There are of course ways of editing from a centralized storage solution with FCPX that involve SAN setups, but the overall costs starts to rise pretty quickly and these solutions are generally overkill unless you’re working with three or more editors. It’s also a large investment in storage and networking that requires professional planning, installation, and generally some kind of periodic maintenance. And if something goes wrong, it can mean having zero productivity across all projects until it’s fixed.
For those that are interested, there is some good information over at FCPWorks that talks about SAN workflows with FCPX.
Simple Solutions for Centralized Editing with FCPX
For our situation, we knew we didn’t need a SAN level solution, but we wanted to have things centralized and with good data movement. We also knew we needed a solution to deal with future projects that will be 4K or larger. More and more of our clients want to shoot 4k material to ensure they have evergreen content for the future, so this was a good time for us to do some overhaul to out studio setup, as well as, and find a solution for having two or three computers editing from a centralized storage location and use FCPX.
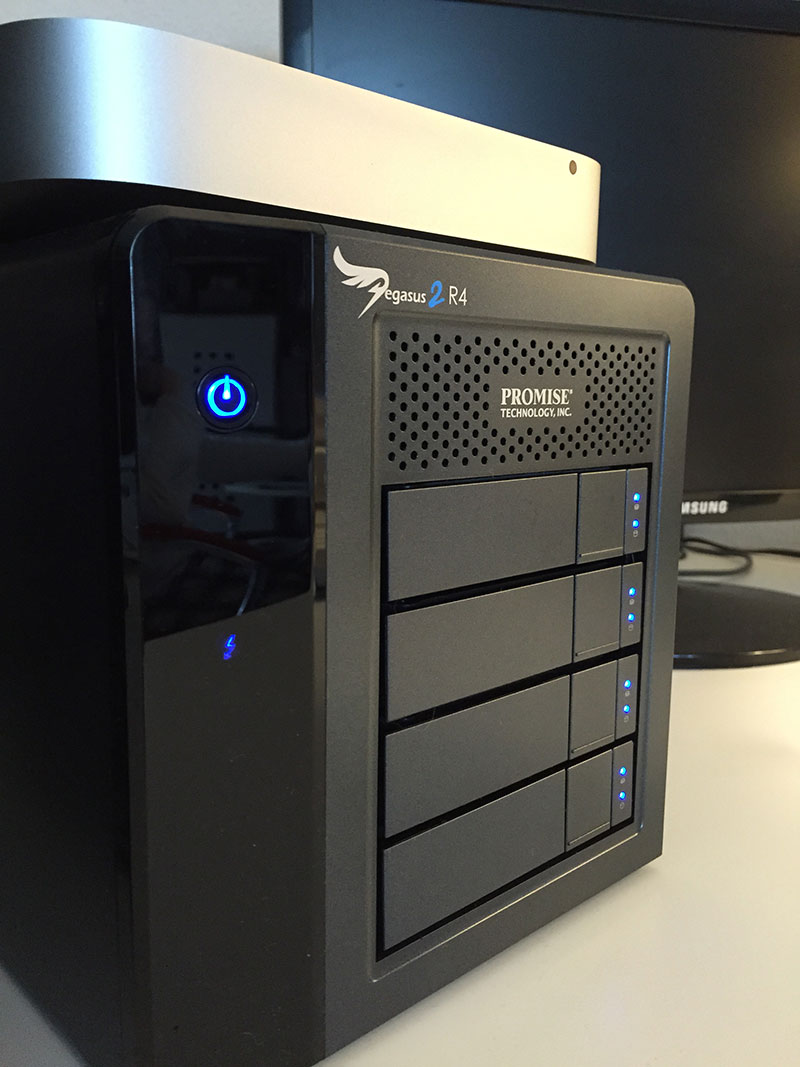
After doing a good amount of research, we decided to purchase an 8 terabyte Pegasus2 Series R4 RAID(four drive bays) from Promise Technologies. The Pegasus 2’s have dual Thunderbolt 2 ports which are capable of 20 Gbps per second which is more than enough throughput for most editing. In fact, this is far more data than any drives can read or write currently.
However, the Pegasus 2 just provides a means of reading and writing the project and would work well for one of our 27″ iMacs, but how to set it up so both can use it?
The Power of the Mac Mini
This is where Apple’s latest Mac Mini comes into play. They have recently dropped in price, but were upgraded with a key component of having Thunderbolt 2 as well as Gigabit ethernet. So we have the Pegasus 2 connected to the Mac Mini via Thunderbolt 2 and then the iMac’s are able to connect to the Mini over Gigabit ethernet via an Airport Extreme.
This enables us to have a dedicated server type machine control the data handling instead of one of the editing stations and also allows us to have a machine that is capable of dealing with backing up the projects as well. To connect all of the computers we are using an Apple Airport Extreme that has Gigabit ethernet to connect the Mini and the two iMacs. We’ve also made sure to enable Jumbo frames in the Advanced Network settings on all of the machines and turned off Flow-Control.
Backing It All Up
Having multiple machines editing form a single storage solution is great, but you also want to make sure you’re backing it all up effectively. In addition to the Pegasus 2 R4 connected to the Mac Mini, we also have a Mediasonic 8 Bay External Hardrive enclosure connected via USB 3. The Mediasonic is just a JBOD (just a bunch of drives) and does not function as a RAID. However we have it stuffed with about 24 terabytes of backup. We then use Econ Technologie’s Chronosync to automatically back up the FCPX projects on a daily basis (usually around 11PM) to dedicated backup drives in the Mediasonic 8 Bay enclosure. The USB 3 is certainly not as fast as Thunderbolt 2, but since this is just for backing up active and completed projects and not for editing, it works just fine.
Additionally we have a Seagate Thunderbolt drive caddy attached to the Mac Mini that allows us to attach raw drives to either create offsite backups or to copy files over to drives for clients.

How to Use FCPX with the Pegasus2 R4 Over a Network
All of the projects are ingested on the Mac Mini and set up using FCPX on the Mini with the projects residing on the Pegasus 2. We make sure that the libraries are external and are pointing to the Media folder for the project on the Pegasus 2 along with the FCPX Cache folder and the Backup folder. We then use one of the 27″ iMac editing stations to connect via the local Gigabit LAN to the MacMini and move the FCPX Library file to the iMac’s desktop and launch it from there. FCPX will launch on the local iMac and most of the time it will automatically find the media on the Mac Mini across the network. (Here’s a great tutorial on how to automatically connect to a network drive at login in OS X.)
From there you simply edit as you normally would and when you’re done you can move the Library file from your desktop back over to the Project folder on the Pegasus 2. We normally have a backup folder inside the FCPX project folder and simply move the last Library file on the server to the backups folder, and then put the Library file from our desktop into the main Project directory on the Pegasus 2. This way we still have the backups, and if another editor needs to load the project on their machine, they know that the Library in the main folder of the Project is the one to use instead of hunting around on other editor’s desktops looking for who opened it last.
Here’s a quick video to show you how it works:
Proxies and ProRes
A lot of what we edit comes from the Canon C100 which is ACVHD and pretty easy to manage data wise. However we also work with material from RED Epic that is 5K and that’s far more to tackle. Bandwidth is always going to a key part to any networking solution, and even though the Thunderbolt 2 spec allows for up to 20 Gigabits throughput, you’ll still have a “bottleneck” with the Gigabit ethernet connections running between machines. This is where using Final Cut Pro X’s amazing ability to easily create and manage optimized media comes in. Often we will have FCP X create proxies of the footage and we work with that over the network. Apple’s ProRes codec gives you something around 45 Mbps for 1920×1080 resolution at 29.97 fps. If you’re shooting higher FPS you need to take this into consideration as well. (Don’t think we’ll be working with any Phantom footage soon, but would love to try it on our setup.)
When we’re done with the edit, it’s easy enough to switch back to the original footage and export a “Texas Master” from that source for delivery.
Things To Consider
This type of setup works well in an environment where you have two or three editors working on different projects at once. It does not allow multiple editors to work the same FCPX Library at the same time. It’s also important to make sure your ethernet cable runs aren’t overly long and that you’re using good Cat 5, or preferably Cat 6 cable to connect everything. You could connect the Macs via Thunderbolt to get even faster throughput but there seem to be some issues with data drop outs at the moment. More testing on that to come in the future.
Overall this set up has been working smoothly for us over the last month or two and has resulted in a lot less transfer of projects via our local edit drives that were connected directly to the iMacs. The centralization of all the projects has also meant having things securely backed up to give peace of mind.
I would like to thank Chris Fenwick at FCPX Grill for helping plant the seed of this idea. He’s talked about a somewhat similar setup that they use at Slice Editorial and listening to his awesome podcasts helped us to work out a version of the idea that suited our needs here at Pixel Bokeh Productions.
If you have questions or thoughts, please let me know.
Thanks,
Einar
Pixel Bokeh Productions
Share this Post
Recent Comments